# Integrating with a React App
# Creating a dApp
Before you start integrating you need to go and create and config your dApp on our self service portal, which you can access through here. Once you have created your dApp you will be given an appId which you will use in your integration.
# GitHub Repo
A full React code integration example can be seen here.
# HTTPS
Your domain must ALWAYS run https when pointing to the wallet else it will be rejected. This is also required on local development.
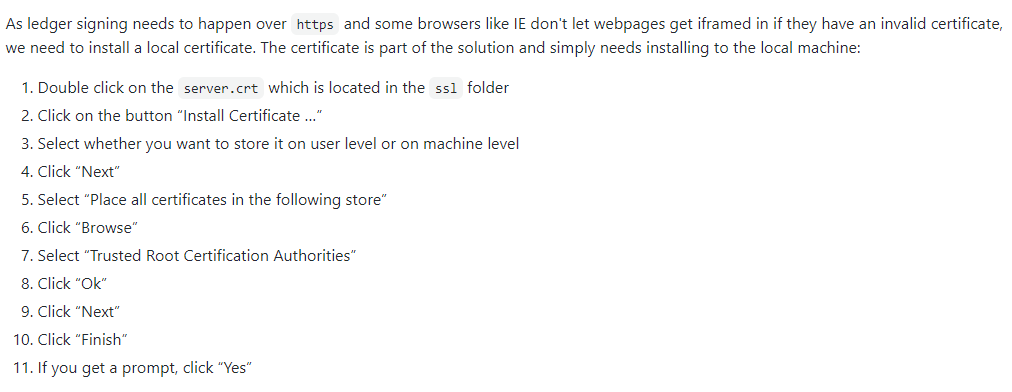
# Set Up HTTPS on localhost
First, please grab the ssl folder with all the files from here and drop it into the root of your project.
You then need to create a .env file in the root which looks like:
HTTPS=true
SSL_CRT_FILE=./ssl/server.crt
SSL_KEY_FILE=./ssl/server.key
If you already have a .env just add the above properties to it.
When you serve this now using react-scripts start, it will serve it on HTTPS. You will need to install the HTTPS cert as shown below:

# Installing the FunFair Wallet SDK
# TypeScript Typings
This guide will be shown in js but all the same rules apply for react ts projects. Make sure you use all the typings supplied in the SDK. As the SDK is exposed on the window object, you should use the window object supplied by the SDK. This extends the Window object as well, so you can use it for standard window calls. This will give you full compile time errors on your wallet integration.
import window from '@funfair-tech/wallet-sdk/window';
# Hooking up the SDK
Most of our integrators have many wallets they support. For this case our wallet is lazy loaded aka only loaded when you need it.
# Authentication
It's up to the integration to show the user the login and logout buttons, which allows flexibility on designs.
# Show wallet UI
# React Package
You only need to install this package if you want to show the UI.
We have created a React package component library this package holds components allowing you to hook the UI for the wallet into an Angular app easier. A full code integration example can be seen here
To show any wallet UI you have to import the WalletFollower from the sdk.
import { WalletFollower } from '@funfair-tech/wallet-react';
Usage:
<WalletFollower />
If you want to deep link into a page on the Wallet, see here. By default the main /funds page will load. Please note, you must only show if the user is authenticated.
# KYC - Feature Request Only!
KYC is a billable feature due to costs we have to pay third party KYC providers. You will have to get in contact with FunFair if you want this feature turned on. To get in contact with us, please join our Discord by clicking here.
If you do not want to have KYC as a feature on your dApp please ignore this section completely.
To read more about our providers and countries we cover please read here.
It is up to the dApp to decide if they want to use our KYC feature or not and at which stage. The events get fired regardless but its up to the dApp to listen to them if they want to use it. The dApp needs to listen to isKycVerified event which will fire when the user has successfully passed or failed KYC. It also fires on initial login with the value of that logged in user's KYC status. You can listen to kycProcessCancelled event which will fire when the user cancels or closes the KYC modal. The reason we made the dApp handle this is to give them greater flexibility on when you show the KYC stage and what your client does after it was cancelled.
To check if the user has KYC'ed or not you can call isKycVerified
const isKycVerified = await window.funwallet.sdk.kyc.isVerified();
If that returns false (i.e. they are not KYC'd), you can trigger the KYC modal to open by calling sdk.kyc.start() SDK method:
await window.funwallet.sdk.kyc.start();
Once completed, you will get the status of the pass/fail through isKycVerified event. Obviously, if they do not complete the KYC you will see them cancel it with the kycProcessCancelled event.
# Speaking to the Blockchain (web3/etherjs)
Now you have the Wallet all hooked up, you can start speaking to the blockchain. Most developers use web3 and etherjs to interact with the blockchain. The SDK exposes our own EIP-1193 compatible Ethereum provider.
// provider lives here in the FunFair Wallet SDK object
window.funwallet.sdk.ethereum;
To read more about the Ethereum provider please read here.
This can be injected into any new web3 or ethers instance. This means you can use the standard web3 or ethers interface to do all your blockchain calls and our Ethereum provider makes sure all those calls go through the authenticated leader Wallet instance. This means minimal changes to your blockchain code.
Once you the leader has loaded, the SDK will expose the Ethereum provider on the window, which can be used as the provider you inject when you create a new web3 or ethers instance.
# web3
# etherjs
All your web3 or ethers calls now will work as normal but proxy through to the Wallet. Use the library to now send transaction and do all things blockchain.
NOTE
We don't support eth_sign, eth_signTransaction and eth_sendRawTransaction due to the security concerns with signing and not sending. You can only sign and send with our Wallet. Also eth_newFilter, eth_newBlockFilter, eth_getFilterChanges, eth_getFilterLogs, eth_uninstallFilter and eth_newPendingTransactionFilter are not supported by our nodes so will not work.
# Demo Using web3 in the Example Code Above
First, you need to make sure web3 is installed:
# Destroying the fun wallet injected logic
Many dApps support many wallets and you may want to destroy all trace of the fun wallet logic once the user is done using it. A destroy method is exposed on the FunWalletEmbed class which will remove everything the wallet injected from your dApp.
import { FunWalletEmbed } from '@funfair-tech/wallet-sdk';
FunWalletEmbed.destroy();